Zer0-Mistakes Quick Start Guide
Complete setup guide for the Zer0-Mistakes Jekyll theme featuring Docker-first development, AI-powered installation, and cross-platform compatibility
Table of Contents
Quick Start Guide
Get your zer0-mistakes Jekyll site running in under 5 minutes. Choose the path that fits your goal:
flowchart TD
    A([Start]) --> B{What's your goal?}
    B --> C[New site, local dev]
    B --> D[Personal GitHub Pages site]
    B --> E[Add theme to existing repo]
    B --> F[Zero-install / cloud]

    C --> C1["Option A: Install wizard\ncurl … | bash + docker-compose up"]
    C --> C2["Option B: GitHub Template\ngh repo create --template"]
    D --> D1["Option D: Fork/Clone\ngh repo fork + fork-cleanup.sh"]
    E --> E1["Option E: Remote theme\nremote_theme: bamr87/zer0-mistakes"]
    E --> E2["Option F: Ruby Gem\ngem 'jekyll-theme-zer0'"]
    F --> F1["Option C: Codespaces\nOne click, browser-based"]
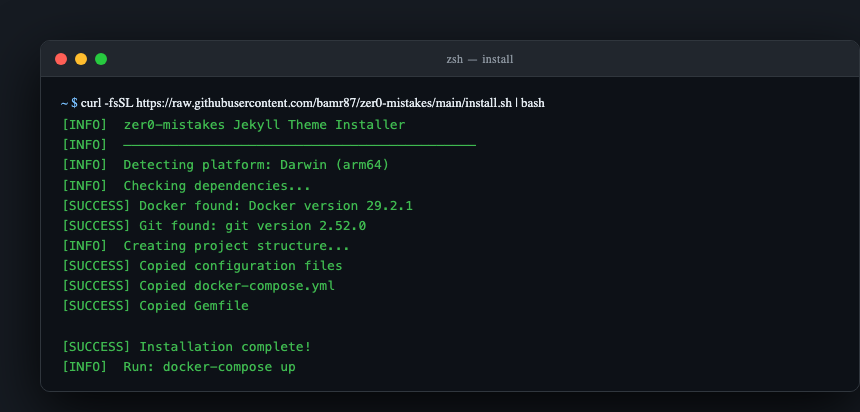
⚡ Fastest Start (1 Command)
mkdir my-site && cd my-site
curl -fsSL https://raw.githubusercontent.com/bamr87/zer0-mistakes/main/install.sh | bash
docker-compose up
Your site will be live at http://localhost:4000.
What You Get
- Docker environment — consistent dev setup across macOS, Linux, and Windows (WSL)
- Bootstrap 5.3.3 — vendored, responsive, dark-mode-ready
- Live reload — browser updates on every file save
- GitHub Pages compatible — push to
main, site deploys automatically - Privacy-first analytics — PostHog with consent gate, disabled in dev
Installation Options
| Path | Method | Best For |
|---|---|---|
| A | Install wizard (one-liner) | Brand-new local site |
| B | GitHub Template | Clean copy via GitHub UI or CLI |
| C | GitHub Codespaces | Zero-install, browser-based dev |
| D | Fork/Clone | Personal username.github.io site |
| E | Remote theme | Add theme to an existing repo |
| F | Ruby Gem | Traditional Bundler workflow |
Option A — Install Wizard
mkdir my-site && cd my-site
curl -fsSL https://raw.githubusercontent.com/bamr87/zer0-mistakes/main/install.sh | bash
docker-compose up
Option B — GitHub Template
- Go to github.com/bamr87/zer0-mistakes
- Click Use this template → Create a new repository
- Clone your new repo and run
docker-compose up
Or via CLI:
gh repo create my-site --template bamr87/zer0-mistakes --clone
cd my-site && docker-compose up
Option C — GitHub Codespaces
![]()
Or: repo page → Code → Codespaces → Create codespace on main.
Option D — Fork/Clone (Personal Site)
Fork into <your-username>.github.io to get your own GitHub Pages site:
gh repo fork bamr87/zer0-mistakes --clone
cd zer0-mistakes
./scripts/fork-cleanup.sh   # interactive config wizard
docker-compose up
Enable Pages: Settings → Pages → Branch: main → Save.
See docs/FORKING.md for the full fork → configure → personalize guide.
Option E — Remote Theme
# _config.yml
remote_theme: "bamr87/zer0-mistakes"
plugins:
  - jekyll-remote-theme
Enable GitHub Pages in your repo’s Settings → Pages.
Option F — Ruby Gem
# Gemfile
gem "jekyll-theme-zer0"
# _config.yml
theme: "jekyll-theme-zer0"
bundle install && bundle exec jekyll serve
Setup Guides
| Guide | Purpose | Time | Difficulty |
|---|---|---|---|
| Machine Setup | Install Docker, Git, GitHub CLI | 10 min | Beginner |
| Jekyll Setup | Run the dev server, create content | 5 min | Beginner |
| GitHub Setup | Fork, deploy to GitHub Pages | 10 min | Intermediate |
| Personalization | Configure _config.yml for your site |
5 min | Beginner |
Quick Troubleshooting
Port 4000 in use
lsof -i :4000          # see what's running
docker-compose down    # stop any existing containers
docker-compose up      # restart
Docker platform warnings (Apple Silicon)
This is expected — docker-compose.yml already sets platform: linux/amd64. The site works normally.
Jekyll build errors
docker-compose exec jekyll bundle exec jekyll doctor
docker-compose exec jekyll bundle exec jekyll build --trace
Validate your setup:
docker-compose exec -T jekyll bundle exec jekyll build \
  --config '_config.yml,_config_dev.yml'
Need Help?
| Resource | Purpose |
|---|---|
| GitHub Issues | Bug reports and technical support |
| Discussions | Community Q&A and feature requests |
| Installation Guide | Deep-dive setup documentation |
Start with Machine Setup → if this is your first time, or jump straight to Installation Options to pick your path.